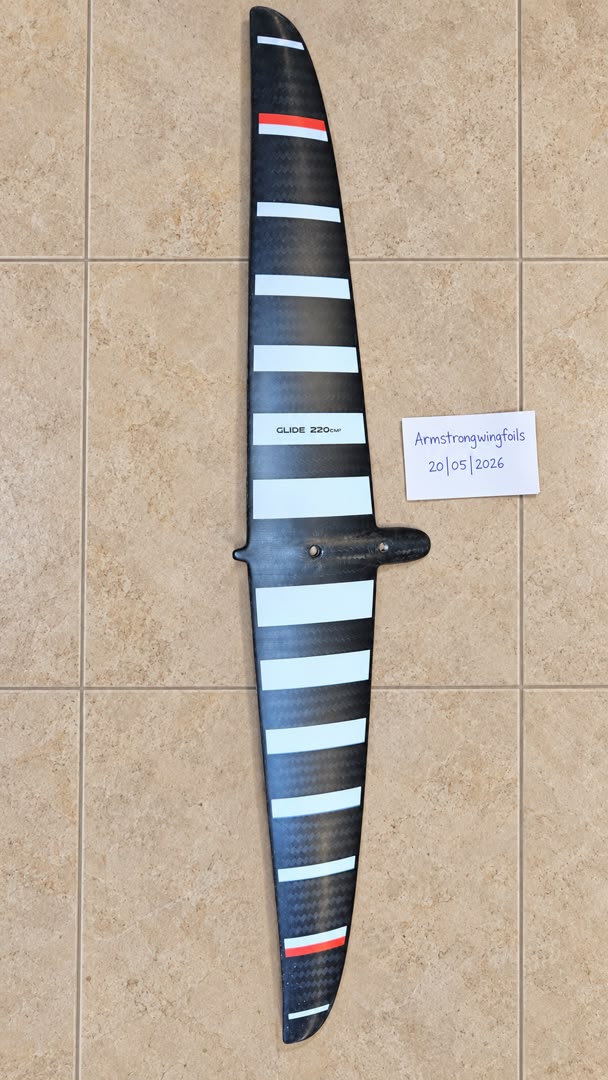
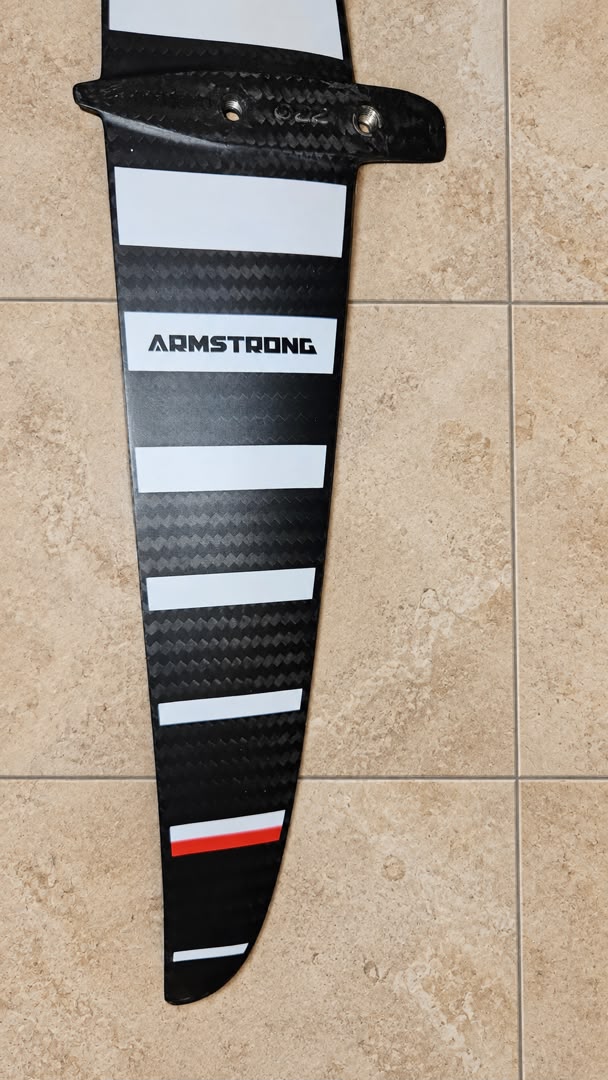
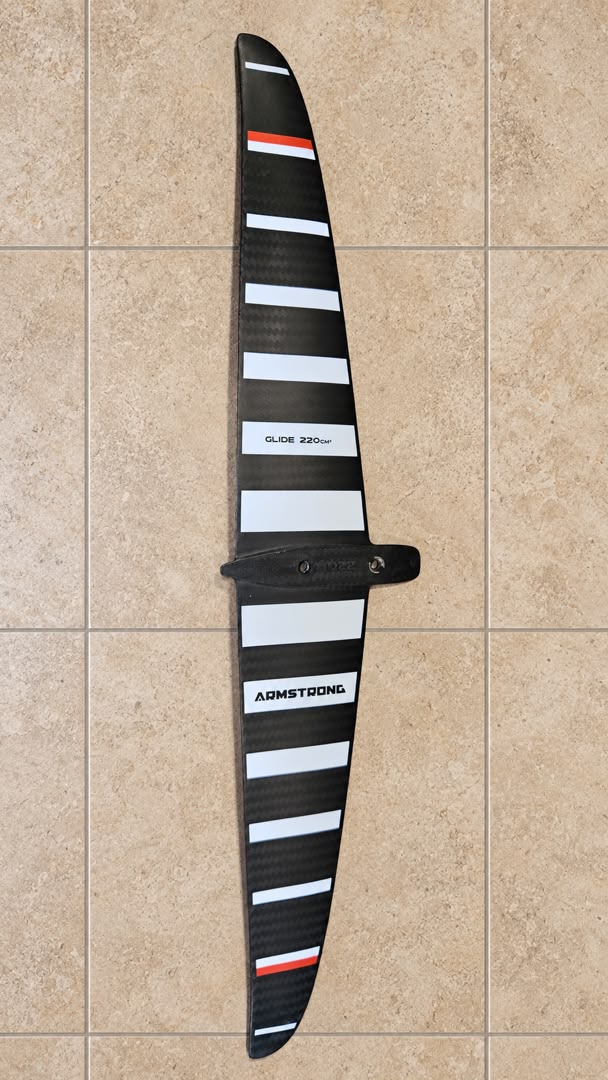
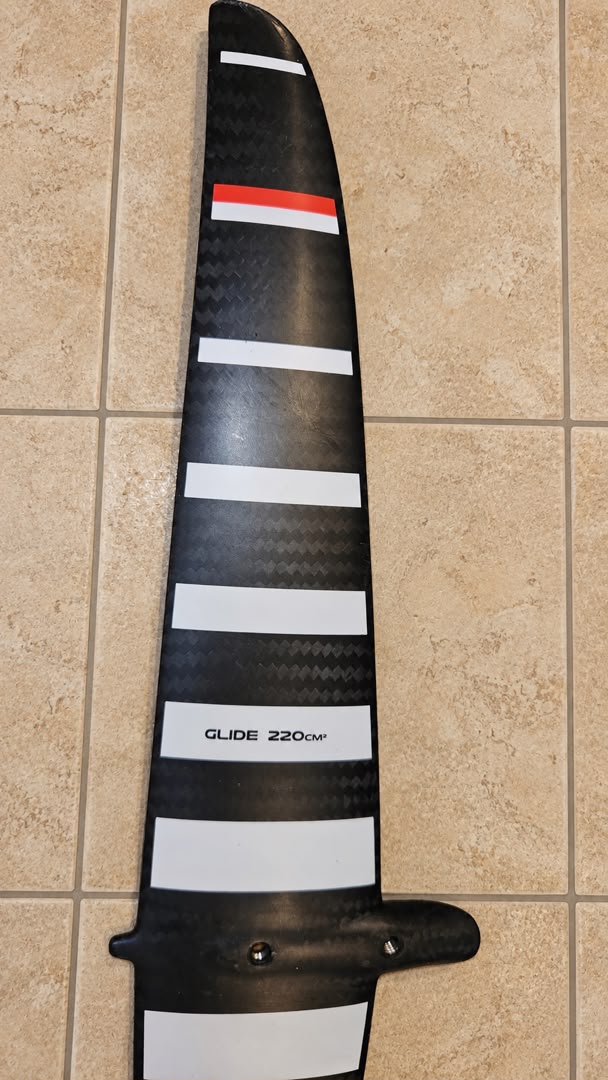
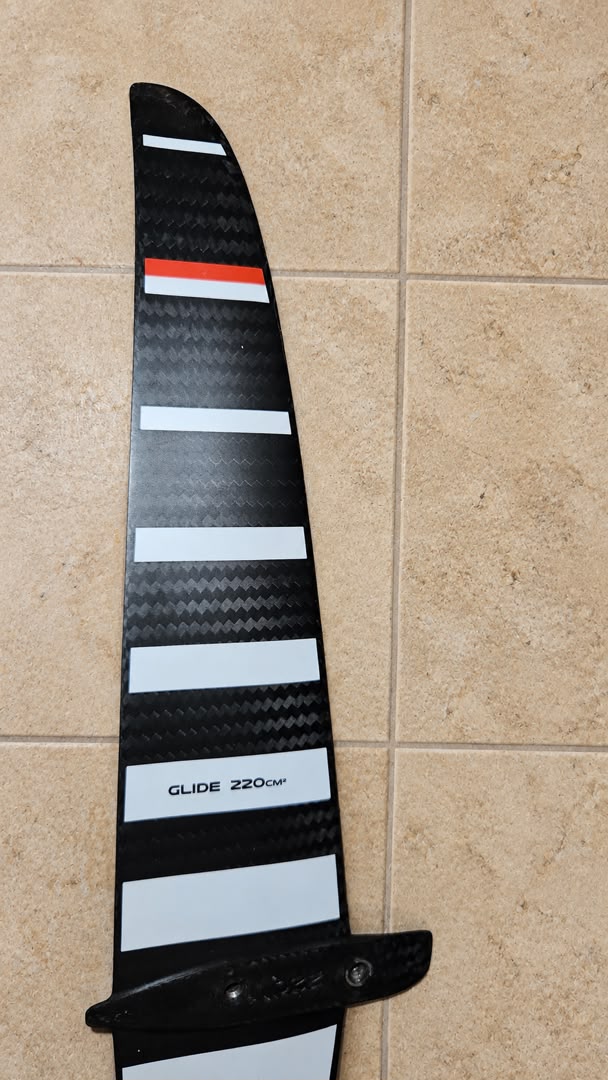

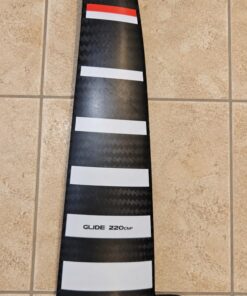
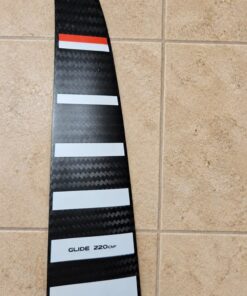
Used Armstrong HA Glide 220
€200.00
The Used Armstrong Glide 220 is a high-aspect rear stabilizer designed for riders who want efficient glide, smooth pitch control, and strong pumping performance. Its thin, low-drag profile helps preserve speed between turns and pump cycles, making it especially effective for longer connections and light-wind or downwind-style sessions.
With a 220 cm² area, 462 mm span, and 9.7 aspect ratio, it offers a refined balance of stability and efficiency without making the setup feel overly restrictive. It works well for intermediate and advanced riders who value long glide, reduced fatigue, and a smooth, predictable feel.
As a used component, it offers excellent value when the edges, tips, mounting holes, and composite structure remain in good condition.
Used Armstrong Glide 220 Stabilizer – High-Aspect Efficiency, Long-Distance Pumping, and Maximum Glide
Used Armstrong Glide 220 Overview
The Used Armstrong Glide 220 is a high-aspect performance stabilizer engineered for riders who prioritize exceptional glide, efficient pumping, reduced drag, and dependable control over long distances. Importantly, the Glide 220 is a rear stabilizer, not an HA Front Foil. Armstrong developed it as an evolution of its earlier HA195 stabilizer, with a narrow outline, wide span, flat rondure, and thin foil section specifically optimized for efficiency. It measures 220 cm² in area, 462 mm in span, and has a 9.7 aspect ratio.
Why Choose the Used Armstrong Glide 220?
The biggest reason to choose the Glide 220 is distance efficiency. Armstrong describes it as the stabilizer to select when maximum glide and long-distance pumping are priorities Used Armstrong HA Glide 220. The thin section reduces drag, while the high-aspect outline helps preserve speed between pumping strokes.
Therefore, riders already using armstrong foils can upgrade the rear of their system without changing the entire setup.
Glide 220 Technical Specifications
The key confirmed specifications include:
- Area: 220 cm²
- Span: 462 mm
- Aspect ratio: 9.7
- Shape: high-aspect outline
- Rondure: flat
- Connection: A+ System
- Intended riders: intermediate through advanced
- Strong applications: light-wind winging, downwind, surf, SUP, wake, and kite use
Armstrong recommends the Glide 220 for riders from approximately 60 kg upward across several disciplines.
How the Glide 220 Improves Efficiency
A stabilizer influences pitch balance, drag, pumping response, and how freely the complete foil travels through the water.
The Glide 220 uses a relatively wide span and thin section to minimize resistance. Consequently, more of the rider’s pumping energy is converted into forward travel rather than being lost through unnecessary drag.
This characteristic can complement a performance hydrofoil front wing, front foil, or wing foil front wing when efficiency matters.
Pairing With an HA Front Foil
The Glide 220 can be paired within Armstrong’s modular ecosystem with suitable front-wing options, including an HA Front Foil where compatibility and rider requirements align.
A rider looking for an HA Front Foil for sale should understand that the front wing provides most of the lift, while the Glide 220 manages the rear stabilization role.
Modern Armstrong HA wings emphasize glide, low-speed lift, turning flow, and pitch stability, while the Glide 220 helps refine overall system efficiency.
Hydrofoil Lift Stability
Good hydrofoil lift stability depends on the interaction between the front wing, stabilizer, mast, fuselage, rider position, and speed.
The Glide 220 does not generate the majority of system lift. Instead, it helps balance pitch forces at the rear.
Its flat, efficient profile is particularly suited to riders who already have sufficient control and want less drag combined with long glide.
Downwind Performance
The Glide 220 is particularly relevant to riders using an armstrong downwind board, armstrong downwind boards, armstrong downwind foil, or armstrong downwind foil board.
During long open-water runs, conserving speed between bumps becomes critical.
Its low-drag design helps the complete foil retain momentum, making it easier to connect sections while reducing unnecessary pumping effort.
Riders familiar with an armstrong v1 downwind board may especially appreciate the stabilizer’s distance-oriented character.
Wing Foiling Performance
For armstrong wing foil use, the Glide 220 works especially well when efficiency and lighter-wind performance are priorities.
When combined with an armstrong wing or armstrong wings, the stabilizer can help create a setup that carries speed through lulls and supports efficient pumping.
It is less about maximum stability for beginners and more about refined efficiency for intermediate or advanced riders.
Surf Foiling Performance
In surf foil use, the Glide 220 can help maintain speed after leaving wave energy.
A rider on a surf foil board, surf foilboard, or other surf foil boards can use the increased efficiency to pump between sections or connect multiple waves.
Because the rear stabilizer produces relatively little drag, the setup can feel freer and faster.
Armstrong Midlength Compatibility
The stabilizer can also form part of a setup built around an armstrong midlength or armstrong mid length board.
Those boards are designed to combine efficient waterline speed with responsive airborne handling.
Pairing an efficient board with an efficient rear stabilizer can create a particularly effective light-wind or longer-distance configuration.
Armstrong Foil Board System
An armstrong foil board or other armstrong foil boards should always be considered together with the complete underwater assembly.
Different foiling board and foiling boards affect takeoff, balance, and swing weight, while the stabilizer influences pitch response and glide once airborne Used Armstrong HA Glide 220.
Therefore, system matching matters more than selecting components independently.
A+ Fuselage Connection
The Glide 220 uses Armstrong’s A+ architecture.
The A+ System joins the mast, armstrong fuselage, front wing, and stabilizer through a rigid modular structure designed for stiffness, durability, and compatibility across disciplines.
This makes upgrading or changing individual components considerably easier.
Performance Mast Pairing
The stabilizer can be combined with an armstrong performance mast as part of a higher-performance setup.
A stiff mast improves energy transfer and reduces unwanted flex, while a low-drag stabilizer helps preserve speed.
Riders searching armstrong integrated foil masts price or armstrong integrated foil masts price 2025 should remember that mast pricing is independent of the Glide 220 itself. Armstrong’s current mast lineup includes several carbon and integrated designs at different price levels.
SUP and Pumping Use
For riders considering a foil for sup, the Glide 220 can be particularly useful when extended glide and pumping efficiency are desirable.
A larger or efficient front wing can provide the required lift, while the stabilizer helps minimize rear-end drag.
That combination can support longer connections between bumps or waves.
Kite Use
The phrase kite armstrong often refers to compact high-speed foil setups.
Armstrong also lists the Glide 220 as suitable for intermediate-to-advanced kite riders from approximately 60 kg upward.
However, riders should match the complete system to speed, body weight, conditions, and experience.
Armstrong Foils for Sale and Buyer Considerations
People searching armstrong foils for sale should understand that a used rear stabilizer can be an economical way to change the character of an existing system.
Before buying, inspect the leading edge, trailing edge, tips, mounting holes, carbon surface, and screw interface.
Minor cosmetic scratches are common, but cracks or structural damage deserve closer examination.
Why the Used Glide 220 Stands Out
The Used Armstrong Glide 220 stands out because its 220 cm² area, 462 mm span, 9.7 aspect ratio, high-aspect outline, flat rondure, and thin profile are specifically focused on reducing drag and extending glide.
For experienced riders involved in armstrong foiling, downwind riding, light-wind sessions, surf connections, pumping, SUP, wake, or kite use, it offers a precise way to make the rear of an existing A+ system more efficient without replacing the complete foil.
Glide Efficiency, Pumping Response, Pitch Control, Carving Feel, Setup Balance, and Real-World Performance
The Used Armstrong Glide 220 is designed to improve efficiency at the rear of a foil system without making the setup feel excessively restrictive. Its role becomes most noticeable when the rider is trying to preserve speed, maintain smooth pitch control, connect sections of energy, or reduce unnecessary drag. Because the stabilizer influences how the entire system balances and responds, its effect is felt through pumping rhythm, carving behavior, acceleration, and overall control rather than through lift alone.
Understanding the Role of the Rear Stabilizer
The rear stabilizer does not carry the rider in the same way as the main lifting surface.
Instead, it helps control pitch and balance.
Its size, shape, angle, and profile all influence how much pressure the rider feels through the front and rear foot.
A well-matched stabilizer can make the entire setup feel calmer, more efficient, and easier to control.
Efficient Forward Glide
One of the strongest characteristics of this design is the way it supports efficient forward travel.
The thinner profile and high-aspect shape help reduce resistance.
That means the rider can preserve more speed after each pump or turn.
In practical use, this can make the system feel freer and less held back.
Reducing Unnecessary Drag
Drag becomes especially noticeable when the rider is trying to cover distance.
A larger or thicker rear component can create more stability, but it may also generate additional resistance.
The Glide 220 takes a more efficiency-focused approach.
Its shape helps the setup move through the water with less energy loss.
Pumping Efficiency
Pumping performance depends heavily on timing and energy transfer.
A low-drag rear stabilizer helps the rider convert more of each pumping cycle into forward movement.
This can reduce fatigue during longer connections.
The rider may find that less exaggerated movement is needed to maintain speed.
Maintaining Pumping Rhythm
Good pumping is about consistency rather than brute force.
The rider should allow the foil to rise, convert that height into forward motion, and then repeat the cycle smoothly.
The stabilizer helps support this rhythm by reducing rear-end drag.
Long-Distance Connections
When moving between separate sections of usable energy, every bit of retained speed matters.
The Glide 220 can help the system carry momentum farther.
This is especially useful when the gap between sections is large.
Low-Speed Control
Despite its efficiency-focused design, the stabilizer still provides useful pitch control at lower speeds.
The rider can maintain a relatively composed feel while moving slowly.
However, the setup may feel more sensitive than a larger, more heavily damped stabilizer.
This makes good technique important.
Pitch Stability
Pitch stability is one of the main jobs of the rear component.
The rider should feel a predictable relationship between front-foot and rear-foot pressure.
A balanced setup allows the rider to hold level flight without constantly correcting.
Front-Foot Pressure
If the setup produces too much front-foot pressure, the rider may become fatigued.
This can sometimes be improved through mast position, shim choice, or stabilizer tuning.
The goal is not to eliminate all pressure.
The goal is to create a comfortable and predictable balance.
Rear-Foot Pressure
Too much rear-foot pressure can make the system feel overly sensitive.
The nose may rise too quickly.
This can create repeated pitch corrections.
A properly tuned setup should feel neutral enough that the rider can relax.
Carving Response
The Glide 220 is designed for riders who want efficiency without completely sacrificing maneuverability.
During turns, the rear stabilizer follows the system smoothly.
The rider can roll into a carve without feeling excessive resistance.
Entering Turns
A smooth carve begins with progressive input.
The rider should lean the system gradually rather than forcing it abruptly.
Once the turn begins, pressure can be increased.
This creates a cleaner arc.
Maintaining Speed Through Turns
An efficient stabilizer helps preserve momentum while carving.
The rider can complete a turn without losing as much speed.
This becomes especially useful when linking multiple sections.
Tight Turns
Tighter turns require stronger roll input.
The Glide 220 can handle these movements, but its wide span means technique still matters.
The rider should avoid overly abrupt corrections.
Long Drawn-Out Turns
The design is especially comfortable in longer arcs.
The rider can maintain speed while carving across a broad line.
This makes the setup feel smooth and predictable.
Acceleration
As the rider gains speed, the stabilizer should remain composed.
Its thin profile helps prevent the rear of the system from feeling excessively loaded.
This contributes to a more efficient acceleration phase.
Higher-Speed Control
At higher speed, the rider should use smaller inputs.
The setup becomes more responsive as water speed increases.
Smooth pressure changes are more effective than aggressive movements.
Light-Wind Sessions
Efficiency becomes particularly useful in lighter conditions.
When power is limited, preserving speed matters more.
The Glide 220 can help the rider maintain momentum through lulls.
Downwind-Style Riding
During long open-water runs, conserving energy is critical.
The rider may need to connect multiple sections of swell.
A low-drag rear stabilizer helps extend glide between those sections.
Surf Riding
In surf, the stabilizer can help the rider carry speed through weaker parts of a wave.
This allows longer rides and smoother transitions.
It can also support pumping back toward another section.
SUP Foiling
For paddle-based foiling, the Glide 220 can help once the system is airborne.
The rider benefits from reduced drag while pumping and connecting bumps.
However, takeoff still depends heavily on the main lifting surface and board speed.
Wake and Tow Use
In powered situations, the stabilizer can provide a smooth and efficient feel.
Because speed is more readily available, the rider can focus on carving and pumping away from the wake.
The reduced drag helps preserve momentum.
Kite-Powered Use
Higher-speed powered riding can benefit from the thin profile.
The stabilizer helps reduce resistance at speed.
However, the rider should ensure the complete system remains balanced for the intended conditions.
Mast Position
Mast position has a major effect on how the stabilizer feels.
Moving the mast forward can increase front-foot pressure.
Moving it backward can reduce that pressure.
Small changes should be tested gradually.
Shim Tuning
Some riders use shims to fine-tune stabilizer angle.
A small angular change can significantly alter pitch balance.
This should be approached carefully.
One change at a time makes setup tuning easier to understand.
Front Wing Pairing
The character of the stabilizer changes depending on the front wing.
A larger front wing may create a more powerful low-speed setup.
A smaller front wing may create a faster and more responsive feel.
The stabilizer should be considered as part of the complete system.
Rider Weight
Heavier riders may appreciate the added support and efficiency of the larger rear stabilizer.
Lighter riders may find the setup more powerful.
The ideal combination depends on weight, technique, and riding style.
Skill-Level Considerations
The Glide 220 is best suited to riders who already understand pitch balance and setup tuning.
Its efficiency-focused design rewards good technique.
Less experienced riders may prefer a more heavily damped rear setup.
Water Conditions
Smooth water makes tuning easier.
The rider can feel small changes in balance more clearly.
Choppy water makes the setup more demanding, but the stabilizer still helps preserve control.
Touchdown Recovery
The stabilizer can help the system recover after a brief board contact if forward speed remains available.
The rider should stay centered and avoid abrupt corrections.
Maintaining momentum is usually more effective than forcing the setup upward.
Connecting Multiple Waves
A major advantage of an efficient rear stabilizer is the ability to preserve speed between waves.
The rider can pump through flat sections more effectively.
This extends ride length and reduces fatigue.
Conserving Rider Energy
Less drag means less effort is needed to maintain speed.
Over a long session, this can make a noticeable difference.
The rider can focus more on line choice and technique rather than constant pumping.
Inspecting a Used Stabilizer
A used example should be checked carefully.
The leading and trailing edges should remain smooth.
The tips should be free from structural cracks.
The mounting holes should not show excessive wear.
Minor scratches are usually cosmetic.
Checking the Mounting Surface
The connection area should remain flat and undamaged.
A poor fit can create vibration or unwanted movement.
The hardware should tighten securely.
Checking the Edges
The leading and trailing edges strongly influence water flow.
Deep chips or rough repairs can increase drag.
Small cosmetic marks are usually less important.
Overall Real-World Performance
The Used Armstrong Glide 220 offers a strong balance of low drag, long glide, smooth pitch control, and efficient pumping.
Its thin profile helps preserve speed.
Its wide span supports stable tracking.
Its high-aspect geometry improves distance efficiency.
Its rear-end balance can make the complete system feel more refined.
When matched correctly with rider weight, mast position, shim choice, front wing, and local conditions, it becomes an excellent performance-oriented stabilizer for riders who value long connections, efficient pumping, smooth carving, and reduced energy loss.
Construction Quality, Edge Condition, Mounting Integrity, Maintenance, Storage, and Long-Term Reliability
The Used Armstrong Glide 220 is a precision composite component, and its long-term performance depends heavily on structural condition, surface quality, mounting accuracy, and careful maintenance. Because the stabilizer works continuously to manage pitch balance and efficiency, even small amounts of edge damage, mounting wear, or surface distortion can influence how the entire setup feels. A well-maintained used example can continue delivering smooth response and excellent glide, but it should be inspected carefully and handled with the same attention as any high-performance foil component.
Understanding Structural Integrity
The stabilizer must remain stiff and true to its original shape.
Its composite construction is designed to resist flex while maintaining low weight.
If the structure becomes damaged, the component may no longer respond predictably under load.
This can affect pitch feel, turning response, and overall system efficiency.
For that reason, structural inspection should always take priority over cosmetic appearance.
Inspecting the Upper Surface
The upper surface should be examined in good light.
Look for cracks, deep scratches, dents, raised areas, or evidence of previous repair.
Minor scuffs are common on used equipment and do not automatically indicate a problem.
However, any area that appears distorted should be checked carefully.
Inspecting the Lower Surface
The underside is equally important.
It should feel smooth and structurally firm.
Deep gouges, impact marks, bubbling, or soft spots may indicate more serious damage.
Because the lower surface plays an important role in water flow, large imperfections can affect efficiency.
Leading Edge Condition
The leading edge is one of the most critical areas to inspect.
It meets the water first and therefore has a strong influence on clean flow.
Small superficial marks may have little effect.
Deep chips or irregular repairs, however, can disturb flow and increase drag.
Why Leading Edge Shape Matters
The original profile is carefully engineered.
If that shape changes significantly, the component may no longer perform as intended.
A rough or uneven edge can create turbulence earlier than necessary.
This may reduce glide and make the rear of the system feel less refined.
Trailing Edge Condition
The trailing edge should also remain straight and consistent.
Because it is thinner, it can be more vulnerable to impact.
Chips, cracks, or deformation should be inspected carefully.
A damaged trailing edge may create unwanted vibration or noise.
Checking the Tips
The tips are common impact areas.
They may contact sand, rocks, vehicle interiors, or other equipment during transport.
Light scuffs are normal.
Cracks, exposed laminate, or broken material are more serious.
Both tips should remain structurally solid.
Tip Symmetry
The two tips should appear symmetrical.
A bent, repaired, or altered tip can make the stabilizer behave differently from one side to the other.
This may create an uneven turning feel.
Symmetry is therefore important.
Inspecting for Delamination
Delamination occurs when internal layers begin separating.
It may appear as soft spots, bubbles, or hollow-sounding areas.
Any suspicious section should be examined carefully.
The stabilizer should feel rigid and consistent across its entire surface.
Checking the Mounting Interface
The mounting interface is another critical area.
It should sit flat and fit securely against the mating surface.
Cracks, deformation, or excessive wear can prevent a precise connection.
A poor interface can reduce stiffness and introduce unwanted movement.
Mounting Hole Condition
The mounting holes should remain round and undamaged.
Excessive wear can cause looseness.
Any elongation, cracking, or crushing around the holes should be taken seriously.
These areas carry repeated load.
Hardware Fit
Fasteners should pass through the mounting holes smoothly.
They should not require excessive force.
Threads should be clean and undamaged.
Using worn or incorrect hardware can damage the connection and reduce reliability.
Avoiding Overtightening
Bolts should be secure but not excessively tight.
Too much force can damage the mounting area or threads.
Even tightening is more important than maximum torque.
A clean, properly fitted connection provides better long-term durability.
Checking for Movement
Once assembled, there should be no unwanted movement between components.
If the stabilizer shifts after tightening, the mounting surfaces and hardware should be inspected.
Movement can affect pitch feel and accelerate wear.
Rinsing After Saltwater Use
Saltwater should be rinsed away after each session.
Fresh water helps reduce salt buildup around hardware and mating surfaces.
This is especially important if the setup will be stored for more than a short period.
Drying Before Storage
The component should be allowed to dry before being packed away.
Moisture trapped inside a cover or bag can remain around hardware and encourage corrosion.
Dry storage also makes future inspection easier.
Protecting the Surface
The stabilizer should not be placed directly on concrete, gravel, or other abrasive surfaces.
Even though the component is strong, repeated scraping can damage the finish.
A padded cover or soft surface is preferable.
Transport Protection
Transport is a common source of damage.
The stabilizer should be protected from heavy objects and sharp edges.
It should not move freely inside a vehicle.
A dedicated cover can help protect the tips and edges.
Removing the Stabilizer for Travel
For long-distance travel, removing the stabilizer from the rest of the system can reduce accidental leverage on the mounting connection.
If it is removed, the mounting hardware should be stored safely.
The component should be protected from bending or impact.
Avoiding Heat Exposure
Prolonged exposure to extreme heat should be avoided.
Leaving composite equipment inside a closed vehicle in direct sun can create unnecessary thermal stress.
A shaded and ventilated storage location is better.
Long-Term Storage
For extended storage, the stabilizer should remain clean, dry, and protected.
It should not be placed under heavy objects.
The edges should not bear weight.
A horizontal or properly supported storage position is preferable.
Pre-Session Inspection
Before each session, perform a quick check.
Inspect the edges.
Look at the tips.
Check the mounting interface.
Confirm that the hardware is secure.
A short inspection can identify problems before they become more serious.
Post-Session Inspection
After riding, look for fresh scratches, impacts, or looseness.
New damage is easier to understand immediately after the session.
If the foil struck something, inspect the relevant area carefully.
Recognizing Cosmetic Wear
Light scratches and surface scuffs are normal on used equipment.
They should be distinguished from structural damage.
Cosmetic wear usually affects appearance more than performance.
Cracks, softness, and deformation are more important.
Recognizing Structural Damage
Structural damage may involve cracks, exposed internal material, soft areas, delamination, or distortion.
These issues can affect both strength and hydrodynamic performance.
A structurally compromised stabilizer should not be used until properly assessed.
Evaluating Previous Repairs
A repaired stabilizer can still perform well if the work was completed professionally.
The repaired area should feel hard and smooth.
Its contour should blend naturally into the surrounding surface.
Poorly shaped repairs can increase drag.
Maintaining the Original Profile
Any repair should preserve the original foil section as closely as possible.
Excess filler can create bumps.
Excess sanding can flatten important contours.
Both can affect performance.
Cleaning the Surface
Routine cleaning should remain simple.
Fresh water and a soft cloth are usually sufficient.
Harsh solvents should be avoided unless specifically approved.
The goal is to remove contamination without altering the finish.
Avoiding Abrasive Materials
Aggressive sanding pads or rough cleaning tools should not be used casually.
They can change the surface shape.
Any refinishing work should be carried out carefully.
Monitoring Performance Changes
Changes in glide, pitch feel, vibration, or turning response can sometimes indicate a physical problem.
If the setup suddenly feels different, the stabilizer should be inspected.
Loose hardware or surface damage may be responsible.
Vibration and Noise
Unexpected vibration should not be ignored.
It can be caused by edge damage, rough repairs, or loose mounting.
The component should be checked before continued use.
Used Purchase Inspection
A buyer should inspect the stabilizer from several angles.
Check the upper and lower surfaces.
Inspect the leading and trailing edges.
Examine both tips.
Look closely at the mounting holes and connection area.
Ask whether the component has been repaired or heavily impacted.
Assessing Value
A used stabilizer with superficial scratches but good structural condition can still offer excellent value.
By contrast, a visually clean component with hidden delamination or mounting damage may be a poor purchase.
Structural integrity matters more than appearance Used Armstrong HA Glide 220 Used Armstrong HA Glide 220.
Long-Term Ownership Value
A well-maintained stabilizer can remain useful for many seasons.
Its maintenance requirements are simple.
Keep it clean.
Protect the edges.
Store it dry.
Use correct hardware.
Inspect it regularly Used Armstrong HA Glide 220Used Armstrong HA Glide 220.
Address damage early.
Preserving Performance
The objective of maintenance is to preserve hydrodynamic shape and structural stiffness.
When the surfaces remain smooth and the mounting connection stays precise, the component can continue delivering efficient glide, predictable pitch control, and smooth handling.
Overall Durability
The Used Armstrong Glide 220 is designed for high-performance use, but careful ownership still matters.
Strong composite construction provides stiffness.
A refined profile supports low drag Used Armstrong HA Glide 220Used Armstrong HA Glide 220.
A secure mounting connection preserves precision Used Armstrong HA Glide 220Used Armstrong HA Glide 220.
Protected edges maintain clean water flow Used Armstrong HA Glide 220Used Armstrong HA Glide 220.
Regular rinsing, dry storage, and thoughtful transport help preserve long-term condition.
With consistent care and timely repair when necessary, a structurally sound used example can continue providing reliable, efficient, and refined performance across many future sessions Used Armstrong HA Glide 220Used Armstrong HA Glide 220.
Be the first to review “Used Armstrong HA Glide 220”
Related products
Used Product
Used Product
Used Product
Used Product

Used Product
Used Product
Used Product
Used Product
Reviews
There are no reviews yet.